Test Stripe Webhooks in Seconds
Stop guessing why your Stripe webhooks aren't working. Get a dedicated HTTPS endpoint, send test events from Stripe, and inspect the raw payload instantly.
Webhookstash gives you a permanent webhook URL with full request history—headers, body, and metadata—so you can debug Stripe integrations without writing a single line of logging code.
Why Stripe Webhook Testing Is Painful
Stripe webhooks are essential for handling payments, subscriptions, and disputes. But testing them is frustrating:
- No local endpoint: Stripe can't reach
localhost:3000 - No visibility: Your server receives the event, but what did Stripe actually send?
- Signature failures:
Webhook signature verification failedwith no context - Test vs. live confusion: Events from the wrong environment hitting the wrong endpoint
Webhookstash solves this by giving you a public HTTPS endpoint that captures and displays every webhook Stripe sends—test mode or live.
How It Works
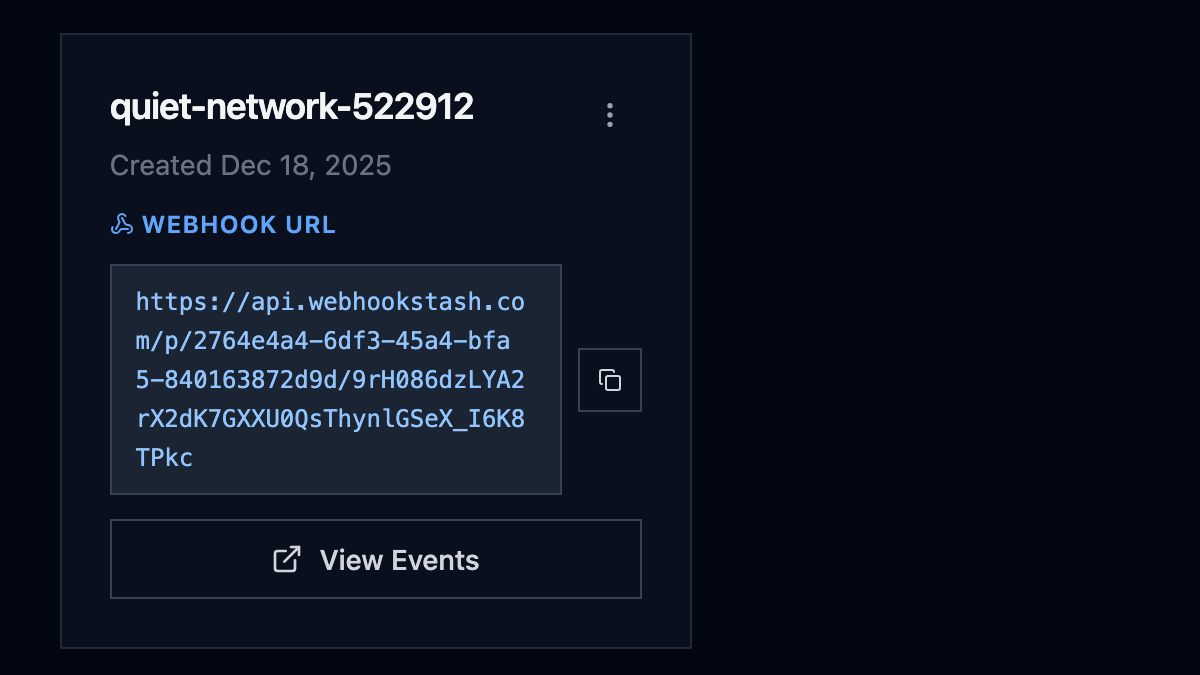
Step 1: Sign in and get your endpoint
Sign in with GitHub to create your first project. You'll immediately get a unique webhook URL:
https://api.webhookstash.com/p/{projectId}/{token}This URL is yours. It doesn't expire, and every request is logged with full headers and body.
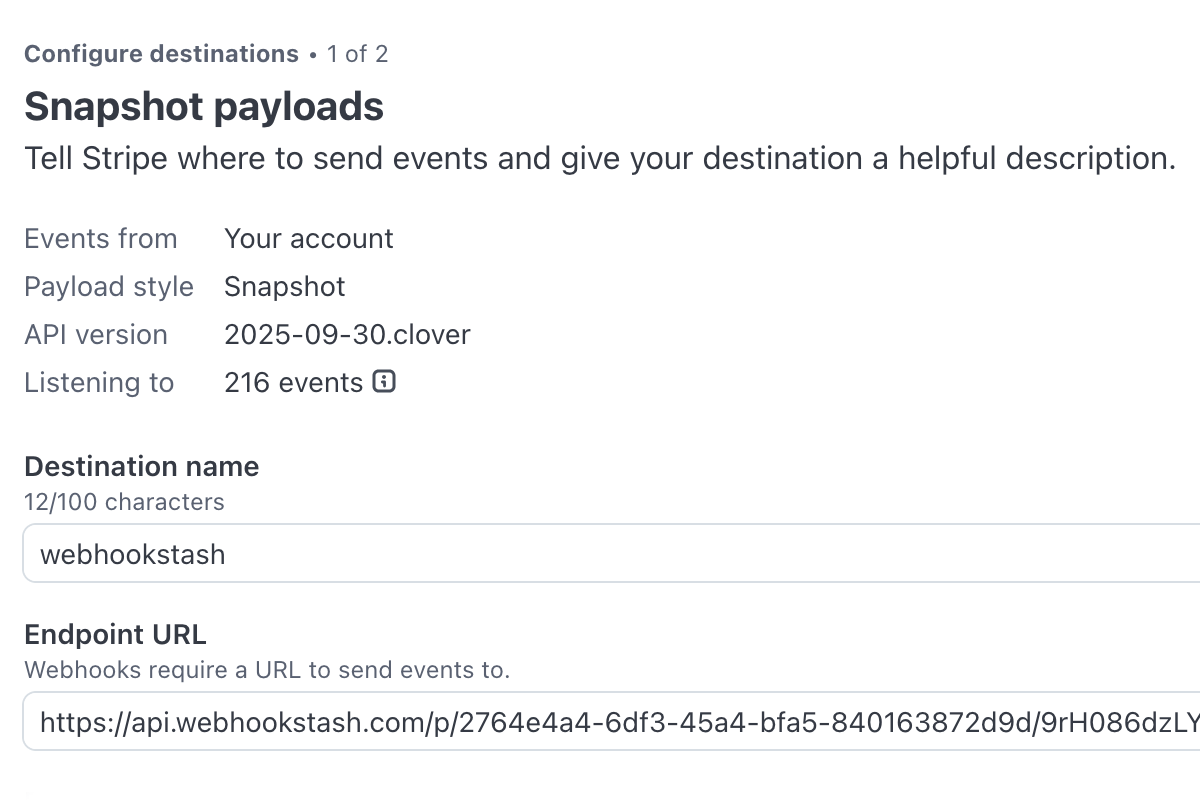
Step 2: Add the endpoint in Stripe
- Open the Stripe Dashboard → Developers → Webhooks
- Click Add endpoint
- Paste your Webhookstash URL
- Select the events you want to receive (or select all for testing)
- Click Add endpoint
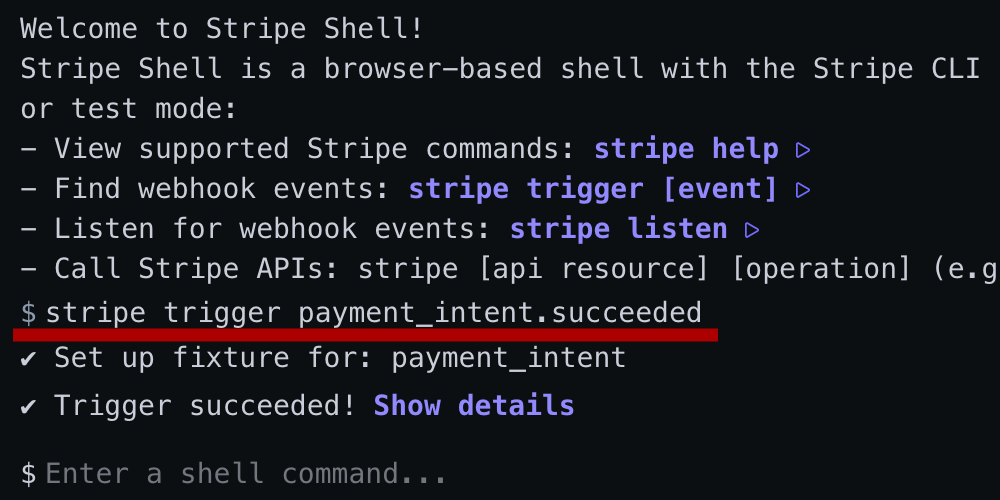
Step 3: Send a test event with Stripe CLI
The Stripe CLI is the fastest way to trigger test webhooks. Install it and log in:
brew install stripe/stripe-cli/stripestripe loginThen trigger a test event. This sends a real webhook to your configured endpoint:
stripe trigger payment_intent.succeededOther useful events to test:
stripe trigger checkout.session.completedstripe trigger invoice.payment_failedstripe trigger customer.subscription.created
Alternative: Send test webhook from dashboard
Some Stripe dashboard versions include a "Send test webhook" button on the endpoint detail page. If you see this option:
- Go to your webhook endpoint in Stripe Dashboard
- Click Send test webhook
- Select an event type and send
Note: This feature may not be available in all dashboard versions. The CLI method above works universally.
Step 4: Inspect the payload in Webhookstash
Switch to Webhookstash. Your event appears instantly:
- HTTP method and path
- All headers (including
Stripe-Signature) - Raw JSON body with syntax highlighting
- Timestamp and source IP
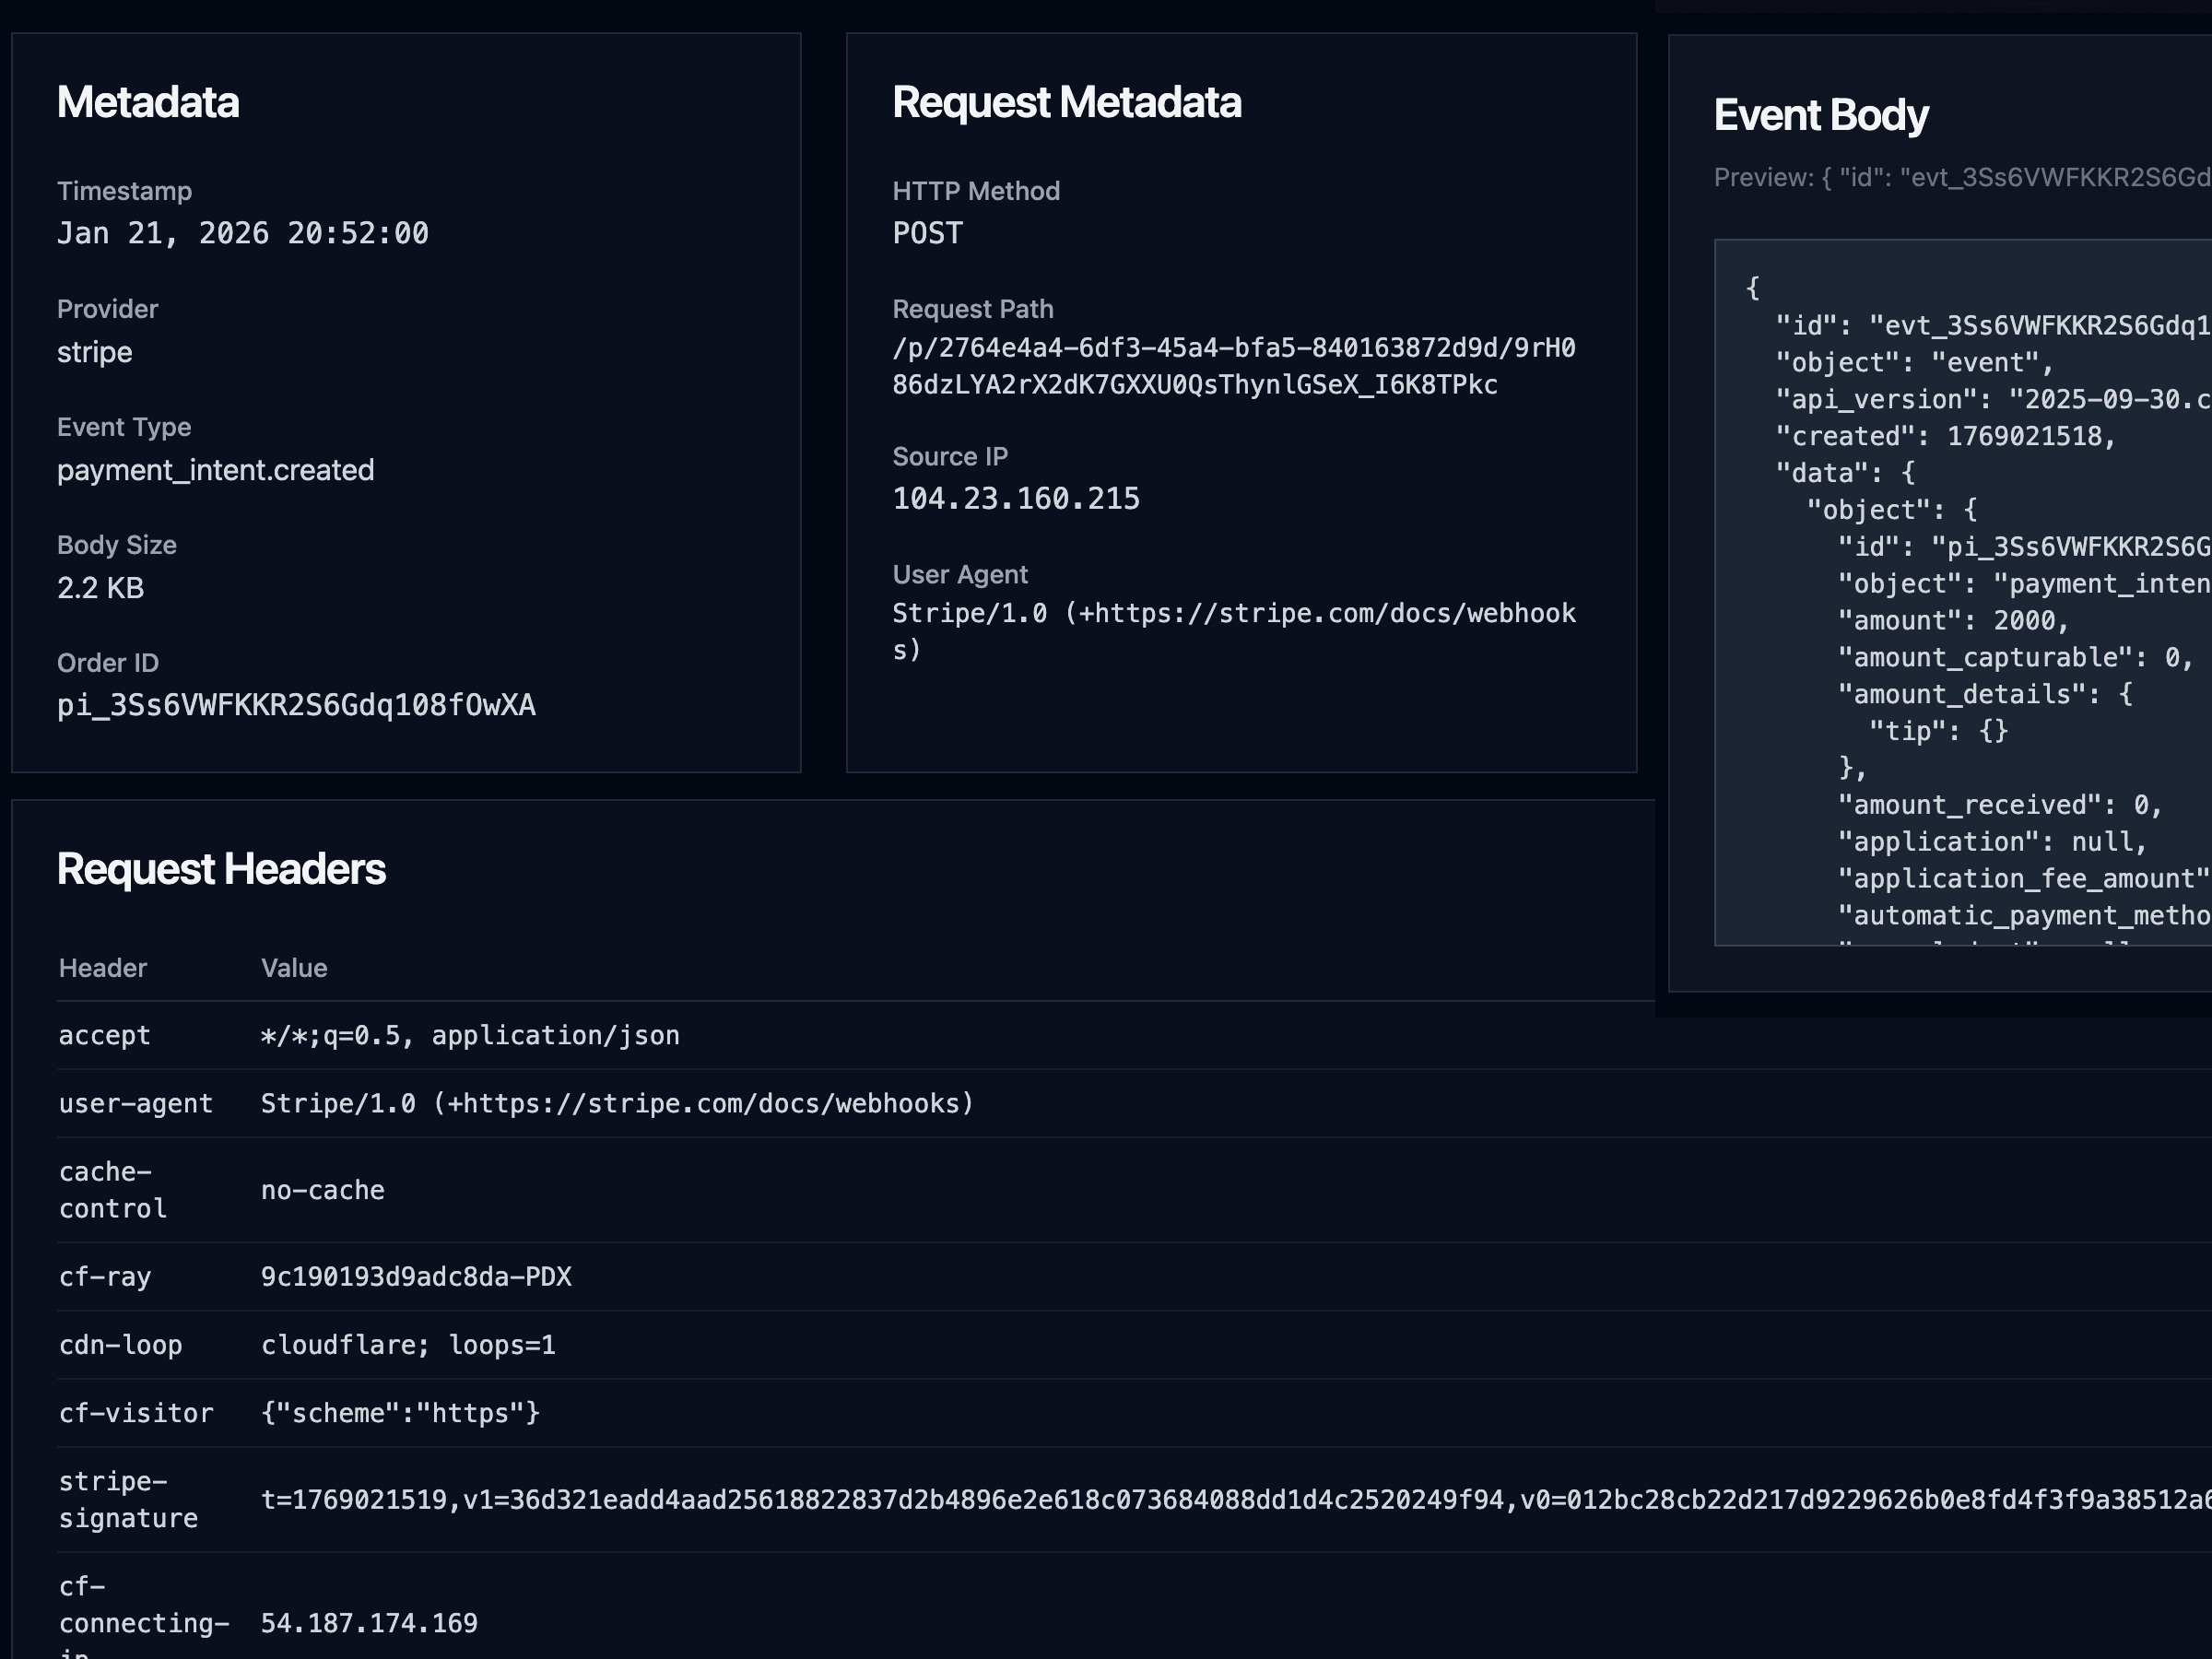
No more console.log. No more guessing.
Key Features for Stripe Testing
| Feature | What it does |
|---|---|
| Instant HTTPS endpoint | Works immediately with Stripe—no tunnels, no configuration |
| Full request capture | Headers, body, method, path, IP address |
| Event history | See all past webhooks, not just the latest |
| Payload search | Find events by type, customer email, or any field |
| Manual replay | Resend any captured webhook to your local server (Pro) |
| Provider detection | Automatically identifies Stripe events |
Common Issues & Fixes
Wrong endpoint URL
Symptom: Stripe shows "Endpoint responded with status 404" or no events appear in Webhookstash.
Fix: Double-check you copied the full URL including the token:
https://api.webhookstash.com/p/{projectId}/{token}The /p/ prefix and both the project ID and token are required.
Signature verification failed
Symptom: Your code throws Webhook signature verification failed when processing events.
Cause: You're using the wrong signing secret, or using a test-mode secret with live-mode events (or vice versa).
Fix:
- In Stripe Dashboard, go to the specific webhook endpoint
- Click Reveal under "Signing secret"
- Use that exact secret in your code—test and live endpoints have different secrets

Tip: Webhookstash shows you the raw Stripe-Signature header. Compare the timestamp and signature version to debug mismatches.
Test mode vs. live mode confusion
Symptom: Events work in test mode but not in production, or vice versa.
Cause: Stripe test mode and live mode are completely separate. Webhooks configured in test mode won't fire for live transactions.
Fix:
- Toggle between Test mode and Live mode in the Stripe dashboard (top-right switch)
- Create separate webhook endpoints for each environment
- Use separate Webhookstash projects if you want to keep events isolated
Local development without public URL
Symptom: You want Stripe to send webhooks to localhost, but that's not possible.
Options:
- Use Webhookstash for inspection, then manually replay events to localhost (Pro feature)
- Use Stripe CLI for local testing:
stripe listen --forward-to localhost:3000/webhook - Use ngrok or similar tunnel to expose your local server
Webhookstash complements the Stripe CLI—use it when you need persistent history or when debugging production/staging environments.
Frequently Asked Questions
Is Webhookstash free?
Yes. The free plan includes 1 project, 3-day event retention, and 20 visible events. Upgrade to Pro for more projects, 30-day retention, and replay functionality.
Do I need to install anything?
No. Webhookstash is a hosted service. Sign in with GitHub, copy your URL, paste it into Stripe—done.
How is this different from webhook.site or RequestBin?
Similar concept, but Webhookstash is built for ongoing debugging, not just one-off inspection: event history with retention, search and filter, replay to your server, and multiple projects to separate environments.
Can I use this for production webhooks?
Yes, but with caution. Webhookstash is primarily a debugging tool. For production, your own server should handle webhooks directly. However, you can use Webhookstash as a secondary endpoint during rollout, configure automatic forwarding (Pro), or keep it as a backup.
Does Webhookstash verify Stripe signatures?
Webhookstash captures the raw Stripe-Signature header but doesn't verify it—that's your server's job. We show you the signature so you can debug verification issues.
What events should I subscribe to?
Start broad, then narrow down. For testing, select all events to see what Stripe sends. In production, subscribe only to events you handle (e.g., checkout.session.completed, invoice.payment_failed).
How long are events stored?
Free plan: 3 days. Pro plan: 30 days.
Can I delete events or projects?
Yes. You can archive projects from the dashboard. Events are automatically deleted after the retention period.
Start Testing in 30 Seconds
- Sign in with GitHub
- Copy your webhook URL
- Paste it into Stripe Dashboard → Webhooks
- Send a test event
- Inspect the payload in Webhookstash
No code. No configuration. No waiting.